Lightroom 3 hits shelves on July 1st, but you can get it early via download: http://www.adobe.com/products/photoshoplightroom/
I got mine last night and I’m already in love with the noise reduction improvements and the new lens correction tools.
Lightroom 3 hits shelves on July 1st, but you can get it early via download: http://www.adobe.com/products/photoshoplightroom/
I got mine last night and I’m already in love with the noise reduction improvements and the new lens correction tools.
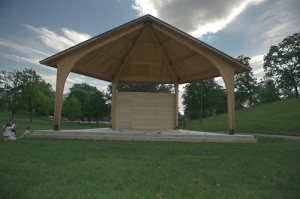
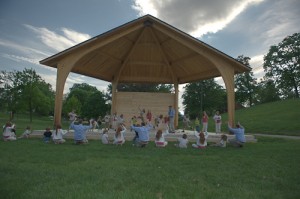
During Spontaneous Art Week my very cool friends invited some very cool KIVA kids to the newly built outdoor auditorium at a local park to break in the new stage by playing on any instruments they could scrounge up (including pots and pans.) Due to bad weather rolling in, there ended up being only three kids and no audience. So what to do? Fill the stage anyway…
The Clone Shot
This is a pretty easy trick shot, though it does require use of photo editing software like Photoshop or Paint Shop Pro. The idea is simple. Pose your subject(s), shoot, move them, shoot, repeat until you have plenty to work with then combine those shots so that you have one shot containing everything.
Setup
There are two very important things that go into getting this shot right.
Execution
The kids didn’t quite understand what I was pitching, so to make it easier we spread the instruments across the stage so that they could go pick them up, play for a minute (while I shot), put them down, and move to the next one. After they had gone through all the spots, I had them “go crazy” for a bit and took some additional shots for fun.
For the audience row I had them sit down and pretend to react to the concert they had just put on. Then I’d ask them to scoot left and do it again. Continue until you get all the way across. When the performer and audience shots were all taken I also made sure to take a shot of the empty stage and one of the empty stage but correctly exposed for the sky behind it.
Post-Processing
Okay, so we have a bunch of images of three kids in different spots. It’s time to combine them. We fire up our favorite photo editing software that can work in layers and masks. (There are plenty of programs that will do this, so I’m going to speak in generalities instead of describing one specific program.) If you’re not familiar with working in layers, think of it like cutting pictures out of magazines and laying them on top of each other to make a collage. The pictures on the front block the ones in the back. Layers are how we stack the images.
First, I start by adding the empty stage (exposed for the performers.)

Add the image with the correctly exposed sky as a new layer on top of this. Using the mask ability, we tell the program to hide the new layer. Then we go through and remove the mask over the parts of the sky we want to see. Now we should be left with a background that has a well exposed stage and a properly exposed sky. (Almost like a poor man’s HDR.)


We’re ready for our performers! To make it easy, I start on the left side and using LightRoom to browse through the shots until I find the best looking performer to fill the spot. When I find them, I add that shot as a new layer on top of the stage. Then apply the mask and reveal the performer I want (just like with the sky behind the stage.) This process is repeated until I’ve filled the stage all the way across being sure to watch for perspective issues. (It’s possible to end up with some very odd looking results if you put someone who was near the back of the stage onto a layer above someone who was on the front of the stage.)


Now we add in the audience using the same process as we did for the performers.

Finally, the image is compressed down into one layer and sent back to Lightroom where we can work it up like any other photo – fixing the rotation, cropping, contrast, etc.

And that’s it! Why not take a picture of you having a conversation with one or more of yourself? Or check out the Multiplicity group on Flickr. Have fun!
 Ever since my flaming 1up mushroom picture went semi-famous I’ve been getting questions about how it was taken. I’ve found some good write-ups online that talk about it, but nowhere that shows the whole process, so here you go. I’m not really set up for video so excuse the less than stellar production value, but at any rate, I hope this helps! I’d love to hear from you if it does.
Check out William van der Steen’s DIY technique for shooting sliced fruit. This is definitely going on my to-do list.
A neutral density filter is a screw on attachment for your lens that blocks some portion of the incoming light without (hopefully) affecting the light in other ways. It’s kind of like having a pair of sunglasses for your camera. ND filters come in different strengths (according to the amount of light they let through), different sizes (depending on the lens you’re using), and different glass qualities (just like how some lenses are better than others.)
What do you do with an ND filter?
Primarily, the ND filter is used to increase the shutter speed without increasing your F-stop and/or overexposing the shot. Common examples are waterfalls with the cotton candy water look and shots with the misty looking waves around ocean rocks and piers. With some experimentation you’ll find more creative uses like taking a picture of busy places without having the people/traffic show up or shots of someone looking sharp in the midst of a sea of blurry people.
Which one should you get?
These things aren’t cheap so you’ll want to give some thought to the type of shooting you intend to do. I wanted to do very long exposures during the day using my 24-70mm so I went with a B&W 3.0 ND Filter. The 3.0 is a 10 stop filter, or said another way, lets in just .1% of the light (so it’s more like a welding mask instead of sunglasses.) With that filter I can easily get 5-10 minute exposures in daylight. The downside is that you can’t see anything through your viewfinder with the filter attached so I have to set up, compose the shot, and then put the filter on trying to be very careful not to mess up the framing/focus.
Note: There are some variable ND filters out there where you can rotate them to make them lighter/darker (two circular polarizers screwed together?), but I’ve not seen them in action and don’t know about their quality.